Before you get a box turtle, it is time to set up a beautiful housing for your turtle. The several species of box turtles commonly kept as pets live in different kinds of natural habitats. Depending on the box turtle’s natural habitat, it can live in different setups when kep as a pet. This post will tell you everything about the different types of box turtle habitats, the ideal housing for your type of box turtle and how to build an indoor and outdoor box turtle habitat.
The more you know about the natural environment of the kind of box turtle you have, the better home you will be able to provide it. One thing is for sure, wild box turtles don’t live in houses, apartments or a glass tank. Box turtles are outdoor animals. They need sunlight for health and well-being. The well-being of a turtle is important for you also. A turtle that lives in a glass tank is not the same interesting, inquisitive, funny, bold creature you thought you’d be getting. A box turtle in a tank will likely go into a corner and try to scratch and climb its way out and give up at some point. Many will succumb to various stress-related illnesses or stop eating.
It takes some initial effort, time, and a little money to build the proper setup, but in the long run you have less work and more fun with your turtle. Only use aquariums to house hatchlings, sick, quarantined, or nonhibernating box turtles. We are outlining details on how to set up an aquarium for sick box turtles in our post about box turtle health. For now, let’s get into the topic of box turtle housing.
Here is a quick overview of the contents of this detailed post. You can jump right to the sections by clicking on the links below
– Crucial elements of a box turtle habitat
– How to pair turtles within one enclosure
– What plants to grow in a box turtle habitat
– Housing specifics for certain box turtle species
– The ideal size of your box turtle housing
– The ideal location for the habitat
– How to build an outdoor box turtle habitat (3 versions)
– How to build an indoor box turtle habitat
– Maintainance tips for your box turtle enclosure
This post only focuses on normal box turtle habitats. If you are looking for instructions how to build a hibernation box, check out our hibernation tips. If you have a sick turtle, and want to set up a hospital tank, check out the instructions for that here.
Disclosure: This post contains affiliate links. At no extra cost for you, I may receive a commission if you purchase products mentioned below.
Crucial elements of a box turtle habitat
Regardless if you keep your box turtle in an indoor or outdoor habitat, there are certain elements that need to be present. There are:
The water station
The water station can be a shallow flower pot saucer that is slightly recessed into the ground. Make sure to use a material that can easily be cleaned. Provide the turtle fresh water every day.

![]()
The feeding station
The feeding station can be a gravel area where you can put out a shallow plate of food. You can find all the necessary information on what box turtles eat here.
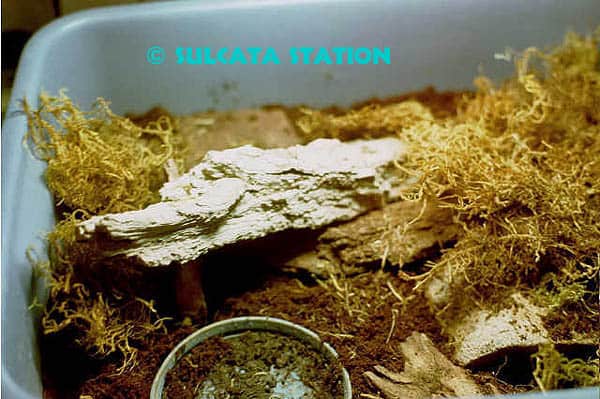
A hiding spot
A hide box should be provided for each turtle within the habitat. Place some sturdy logs in the pen for climbing or for digging under. By placing rocks, plants and logs in the pen, the turtles will have a varied landscape and won’t be able to see eachother. This is very important as turtles need to have space for themselves. Some may even stop eating if they don’t get enough privacy.

![]()
For outdoor turtle habitats: a shady area
The enclosure will also need to have a shady area. Plant shrubs or vegetables for shade.
For indoor turtle habitats: a heating and UV lamp
Turtles that stay indoor need to be kept warm at all times. If the temperature drops too low, the box turtle’s instinct may kick in and tell it that is time to go into hibernation. This means that the turtle will stop eating and get too weak. Make sure to also use a UV lamp for your indoor habitat. Box turtles need sunlight or they may develop various diseases.
If you have more than one turtle: What are the best pairings of box turtles within one enclosure?
Be aware of the male and female ratios as well. Too many males with just one female could be disastrous. The female would be constantly pursued by the males and could become weak and injured. Or the males could fight among each other for dominance and seriously injure or traumatize the less aggressive turtles.
All-female groupings are best, or one male and several females. It’s easy to fall into the trap of getting more and more box turtles. Each turtle has its own personalities and each is different. But with additional turtles come additional responsibility and more time needed for upkeep. What started as a fun hobby could easily become a time-consuming chore.
Turtles from different countries should not be housed together. They shouldn’t be mixed with other species of tortoises or reptile, either. Turtles from different countries may have resistance to different strains of bacteria than your pet. A bacteria that causes no harm to one turtle may make another turtle sick and even kill it. Keep species apart, better to be safe, than sorry.
Plants in a box turtle enclosure
When planting in a turtle enclosure, use edible plants like collard greens, parsley, strawberry plants, clover and alfalfa. Also, make a compost area where grubs and worms can be harvested by your turtle. On a weekly basis pile pesticide-free cut grass in an area and occasionally add some bread or potato peelings and water it well.
Specifics for certain species of box turtles
In the summer, forest-dwelling box turtles like the Eastern box turtle, the three-toed box turtle, Florida box turtle, and Gulf Coast box turtles live in warm, moist and shady environments. All wild box turtles have a home range and know every rock, tree, weed patch and water hole in it. The water tends to be a permanent pond or stream. These forest-dwelling box turtles eat foods that you can usually find in woods and near streams. These are grubs, worms, insects, weeds, fallen fruit, berries and mushrooms.
Worms will flock to the area and the turtle will get a free meal after rains when the worms come up for air. Another idea is to place an outdoor light above the enclosure during summer and leave it on for two hours right after dark. The light will attract moths, June bugs, crickets, and frogs. Your turtles will learn to stay up for the free meal. Plant dwarf fruit trees like mulberry or apple for shade and food.
Different species of box turtles also require different levels of temperature and humidity. Check out our post about temperature, humidity and lights in indoor enclosures for more information.
Specifics for Eastern box turtles
In a habitat for Common or Eastern box turtles, use plants like collard greens, strawberry plants, parsley and clover. If you live in an area where the Eastern or Three-Toed box turtle is native, use any other non-toxic native plants. Make sure to add a compost area where your turtle can find worms.
Specifics for Ornate box turtles
Ornate box turtles naturally live in dry, open, grassy areas. The open areas can be prairies, undisturbed fields, scrub areas or deserts. These areas can get hot, and the turtles spend most of the day buried in the ground in an attempt to stay cool and moist. They have a strong instinct for digging so they can make a humid microenviroment for themselves, so provide them deep, good soil to dig into and stumps or boards to hide under. In the prairies of Kansas, you can often find Ornate box turtles in prairie-dog burrows.
At one time they ate the grubs and dung beetles they found in the manure piles of buffalos. Nowadays, Ornate box turtles are still found in close association with cattle. They also eat grasshoppers, worms, bugs they find under rocks and some grasses, fallen fruits and flowers.
Place the same types of feeding and watering stations for the Western Ornate box turtle as the Easterns. Plants can be prairie grasses, groundcovers, wildflowers, and sparsely leafed shrubs like scrub oak and sagebrush.
Specifics for an Asian box turtle habitat
Asian box turtles come from hot, humid countries. Most live near water and spend much of their time actually in water. They eat worms, fish, frogs, insects and plant material. Their enclosure needs a permanent swimming area that is at least 8 inches deep with sloped sides for easy entry and exit. Their pen should be heavily planted so high humidity is maintained.
During hot days, all types of box turtles will benefit from a light watering with a garden hose. The water will refresh the turtles and make the ground moist and cool. Automatic sprinklers can be set to come on for a few minutes each afternoon during the summer months. It’s important to insure your box turtles do not overheat.
How large should the box turtle habitat be?
The size of your outdoor enclosure should be as large as you can afford to make it. It will need enough space for all the activities box turtles like to do and for placement of the water and feeding stations.
A suitable sized enclosure for three or four turtles is 5 feet by 5 feet. If you have more than 4 turtles, the area should be at least 5 feet by 8 feet.
Don’t keep too many turtles together. Instead of one large pen for 10 turtles, make several smaller pens for groups of 4 or 5 turtles. This is just safe practice. A small group will cause less stress to each other and each can find a niche in the pen.
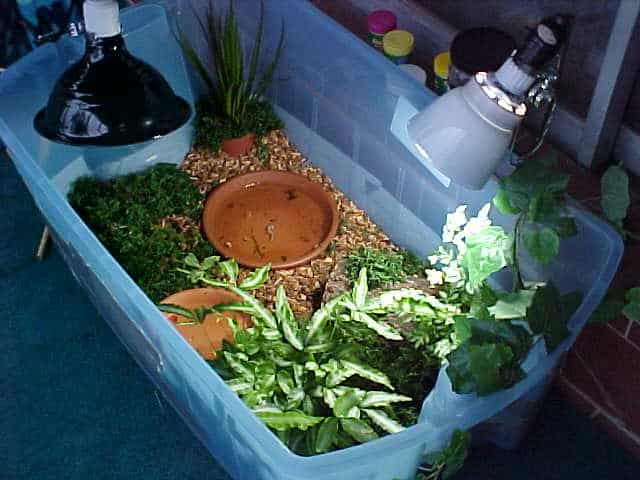
Recommended product: The Aivituvin Wooden Tortoise and Turtle Habitat. It provides a private hide area as well as an open area. It works great as an outdoor enclosure and can also easily be modified as an indoor enclosure by adding the appropriate heating and lighting elements.

![]()
Where to place the outdoor box turtle enclosure?
Placement of the enclosure is important. Don’t put it on the north or west side of a building. These sites get too little or late sunlight.
The best site would be where the sun hits the enclosure early in the morning.
This way the turtles can warm up from the night and begin their day as they would in the wild. The east side of a building is a good spot. Second choice would be the south side, or ideally, it would be in an area that is open on all sides. Access to sunlight is critical as turtles need it to metabolize D3, an important vitamin used for calcium uptake.
Before we get into the actual process of building the outdoor turtle habitat, go through this list of things to consider when building your box turtle housing again:
- Is the location adequate? Does it get sun in the early morning?
- Is it big enough for your turtles? Is there a place for water, feeding, exercise, sleeping and nest building?
- Is it safe from dogs, birds of prey and raccoons?
- Is there shade?
- Does it flood during rainstorms?
- Is it easy to clean and near to fresh water for daily water changes?
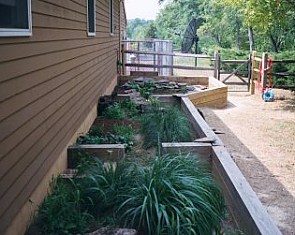
How to build an outdoor box turtle habitat?
Below, we are outlining three different types of housings you can construct for your box turtle. Version one is the most common type of turtle housing. It is also relatively cheap and easy to construct.
Version 1 – Instructions to build a box turtle outdoor enclosure
Here are directions for making an inexpensive outdoor enclosure using a thick vinyl siding that won’t rot or rust and is easy to maintain.
The following dimensions will make an enclosure big enough for 3-4 box turtles.
You’ll need:
- Three to four sheets of vinyl siding. Cut the vinyl sidings into three 16 inch wide pieces and cut one of them in half (two 8 inch pieces). Or use an existing wall of the house or garage and use only three of the vinyl siding pieces.
- 45 feet of 1-inch PVC pipe
- Cut into 8 2-foot lengths. Use these pieces on the two long sides of the pen.
- Cut six, 16-inch lengths which will be used on the two short sides.
- Lastly, cut 10, 22-inch lengths which will be vertical members and sunk 6 inches into the ground for support.
- 10 PVC 1-inch T-shape connectors, 4 elbow connectors and PVC glue.
- Lots of 1-inch galvanized drywall screws.
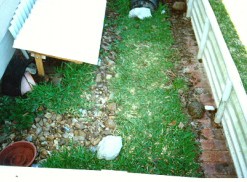
- As many bricks or paving stones as needed to go around the inside perimeter of the enclosure. Remove the sod next to the walls of the enclosure and recess the pavers so their tops are flush with the soil surface.
Pick an area of the yard that receives the morning sun. This would be on the east side of a house or garage. One side of the house or garage could be a side of the enclosure. If you do this, you will not need the 4th length of vinyl siding or PVC pipe. Don’t put the enclosure under a large shade tree or in an area that floods after rains.
The PVC pipe and T-shape and elbow connectors are glued together to make a frame and the siding is screwed onto the frame. Be careful to avoid gaps at the corners of the pen. PVC pipe may be used in the corners to close any gaps. The PVC pipe is also used to anchor the frame into the ground.
The walls of the enclosure should be high enough so the turtle cannot stretch up, grab the top and hoist itself up and over the rim. In fact, double the height you think is safe because turtles are escape artists. You can make the sides of wooden boards, plastic siding, brick or cement. Don’t use lattice or wire because the turtle can see out and will keep trying to squeeze out of the little holes.
Floor the area around the inside perimeter of the wall with recessed paving tiles or bricks. When the turtle digs at the wall, it will learn that there’s no escape that way. Some people recommend sinking chicken wire down about 8 inches. But turtles will still dig holes and the chicken wire can poke out an eye or cut a foot. So I recommend you to use chicken wire.
The box turtle habitat must be a safe haven for your box turtle. Protection from pet dogs, wild animals, birds, biting insects and small children is important. It only takes a dog a few minutes to damage or kill a turtle. If you have dogs you must take responsibility to protect your turtles from them. It means you may have to make modifications to the turtle’s home so it is dog proof. Make the walls higher and stronger. You may even have to place a top over the turtle’s pen.
Add a few potted plants. They can be herbs or vegetables. Do not use plants that may be toxic to turtles. You can find a list of poisonous plants at the California Turtle and Tortoise Club website.
Spread a thick layer of top soil, bark chips made for reptiles and terrarium moss on the bottom. Don’t use pine, fir or cedar shavings as these materials contain harmful oils that are toxic to turtles. They can cause eye, and respiratory problems and even organ damage in box turtles and other reptiles.
Add an area that provides shades as well as a hiding area and a water area for your box turtle. Congratulations, your habitat is already finished!
Version 2 – How to construct a partially in-ground box turtle habitat
You will need:
- Approx 96 12″ perforated bricks.
- 20 FT aluminum or vinyl soffit.
- 1 12FT 1×12 Cedar rough sawn siding.
- 1 8FT 1×12 Cedar rough sawn siding.
- 1 10FT 4″ SQ cedar pole.
- 2 12FT 1×3 Furring strips.
- 1 10FT roll of Garden fencing with 1/2″ squares 48IN wide.
- Cost without the brick and cedar planks~$70.
We chose to use cedar as it is insect resistant and weathers very well. Cedar when used for outdoor pens is not a problem, however never use ceadr for indoor pens. If you choose to build this pen completely above ground do away with the soffit and use 1 each extra of the 12 & 8 foot cedar planks.
Detailed construction instructions
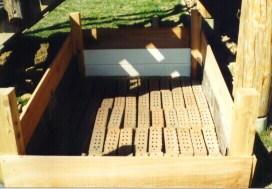
- Dig the hole a little larger than needed for a 4′ x 6′ pen. Next dig the footers aprox 6″ deeper at the corners to sink the poles.
- You will need to cut the cedar siding in half to get 2 6FT & 2 4FT lengths, also cut the pole into 4 equal lengths of 2 1/2FT each. This way there is no waste. After hole is dug and level, screw one of the 4FT lenghts to the poles at both ends so you have a proper guide and lay them in their respective holes in corners. Then do the same at other end. We put the pen together on site in the hole to make sure the cedar siding was level with the ground.
- After this is done you now measure and cut the soffit to size. The inside walls of the pen now measure 8IN shorter because of the 4″ poles at either end. Measure the soffit so that it can be bent at a 90 degree angle and have a 2IN lip to attach to each pole. Attach the soffit by using a staple gun at very close intervals, aproximately 3IN to the botton edge of the cedar planks on the inside. Since we used rough sawn planks they have one smooth side. This is the side we faced into the pen. Be sure you have no rough edges. The soffit, at least aluminum kind, is easily cut to size by scoring it with a sharp knife then bending it until it snaps. This seems to make the cleanest edge.
- After this is done fill in the dirt on the outside of pen & pack it down well to make sure the soffit is sitting in position nice & straight. Next make a layer of brick in bottom of floor making sure the bricks against the soffit are nice and tight against the wall. You may think this is over kill but we have a male Ornate boxer named Moximillian LeRue (MOXY) who could probably be hung upside down by his tail in a turtle straight jacket with his mouth taped shut and he would still get OUT! We used both perferated brick and perforated soffit so that there would be good drainage.
- After bricks are lined on bottom floor start putting the dirt back. We used 50% of the original dirt mixed with 35% peat moss and 15% sand. This works very well and keeps the ground nice and soft for digging. Once you are full almost to top of the soffit put one last single layer of brick around the perimeter to stop the digging at walls, (a wonderful idea taken from Tess).
- Now you are ready to put back some of the grass you hopefully saved. We made 2 ground areas for digging one of which has a nice hollowed out log found in the woods. This is Turtle Hollow. The other 2 hiding places are down in the front of pen. One is Turtle Cove, a 1FT broken length of Tera-Cotta pipe used on inside chimneys. The other is 2 of those 12IN bricks counter sunk partially in ground and reasonably dug out, spaced aprox 14In wide so they can go down into this area. It is covered by a large flat rock. This is the Bedrock Hotel. All three have piled in there and sleep in the stranged positions I’ve ever seen.
- Instead of shrubbery that in a few years would probably get too large for the pen, we bought a couple of Blue Fescus Ornamental grass. These need no care and never get too big , & make GREAT bushes. There is also several ferns that grow wild around here.
- Their pond is a 15 IN x 13IN x2IN heavy duty plastic serving tray bought at an area restaurant supply store. The sides are angled outward and make it easy for even my littlest named Zippadelia Rae (Zippy) to get in and out. This too is sunk into the ground. Magnolea Rose (Magpie) the other female seems to love to use the brick against the walls as a race course.
Now the screen covers. We decided to make screen covers for one obvious reason, MOXY. Also because of unwanted enemies, such as neighborhood dogs, hawks and who knows whatever else which eats all the catfood left on the porch at night. My wonderful husband Don made the covers using the furring strips.

First he mitered the ends like a picture frame and screwed them together with nonrusting angle irons. As you can see from the picture the doors are not of even widths. This is only because we built it under the deck steps for added protection from the wind. I wanted the doors to open outward from the middle.
Second he hinged them with 3 3IN nonrusting door hinges on each side. Then put 2 slide bolts in at either end of the doors in middle where they open, aprox 10IN in from the ends. (This way they can swing up and open completely out of the way and get latched with a hook and eye to the deck poles on either side of the pen when I want it completely open to clean, change water, & redecorate, etc…). When closed they can be latched for safety.
Lastly you are ready to staple the garden wire to the door frame. Don decided it would be stronger to do it from the outside rather than inside if something would decide to come and sit on it. He did an incredably neat precise job. No sharp edges & a perfect staple job.
Version 3 – A unique outdoor turtle living quarters
Below, we are outlining detailed steps on how to build a large closed outdoor box turtle enclosure with separate heating for overwintering. This habitat makes sense if you don’t have enough space in your home and is rather complicated to build. If this is not you, just click here to skip this section and jump to the indoor box turtle housing construction instructions.
Those of us who live in the colder climates on this earth face a common challenge if we decide not to hibernate our land loving turtles. What is best for our shelled friends during the colder winter months when they must be “indoors”? Challenged by this question, Bill (my fiancee) came up with an idea for a unique living quarters for our “herd” of turtles. Stevie (my rehabbed ornate box turtle) lives with our other box turtles in this cozy, homemade “turtle bin.” You’ll read about cost, size and construction, mobility, substrate, water, heat and light, hiding areas, and caves. Read on, maybe you can use some of our ideas.
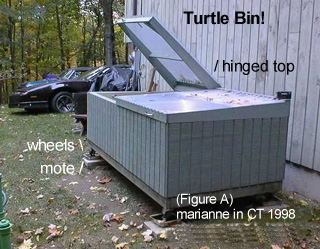
Size and Construction
The huge bin (Figure A) is 4-feet by 8-feet in floor space with 3-feet high walls (1.2m x 2.4m, with 1m walls). There are two “doors” that make up the top of the bin. These 4-foot by 4-foot hinged doors are made of wood framework. Ripply vinyl greenhouse roofing is nailed to the wood. This clear top acts like a moon roof in the summer. When the top is shut, it lets the light in and keeps the cool evening air out.
Mobility
I live in the northeast USA where we have cold and snowy winters. For this reason, the bin sports four large swivel caster wheels, one mounted at each corner. This setup enables us to easily roll it out for the summer sunshine, and roll it back into the garage for the winter. When “parked” for the season, each locked wheel sits on a block of wood centered inside a plastic pan full of water. These pans of water simulate a “moat.” They effectively stop the ants from crawling up the wheels and into the bin.
Substrate
The substrate in the bin consists of about 4-inches (10cm) of mulch. I spray the mulch with water to keep it moist, as needed. Since the bin has a hinged top, the humidity stays high when the top is shut. The turtles love to dig down into the mulch and hide. As a point of interest, I noticed the mulch holds the heat at night very nicely. The turtles noticed it, too, for they dig down in the evening to sleep when the lights click off.
Water
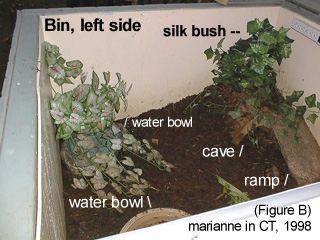
Water is provided by three large water bowls One is a ceramic Lizard Lagoon (giant size, Figure B). The other two bowls are glazed ceramic plant saucers available from plant nurseries. My gulf coast box turtle appreciates the larger 1-foot diameter water bowl. He can fit in it. I change the water in all three bowls daily (or more often as needed). These bowls see a lot of action. Everyone knows that turtles use water bowls for toilets!
Heat and Light
The inside temperature of the bin is maintained around 70F during the night with a gradual rise through-out the day to peak at 85F (21C to ~30C). We accomplished this in a few ways. These temperatures are maintained (economically) because the bin is insulated on all 6 sides with 3-inch thick “pink” foam insulation board between the walls. It’s a bit over-kill, but it works!
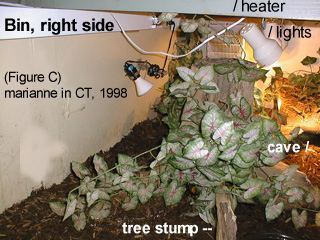
For night heating, there are 2 small electric “bathroom” heaters (on thermostats) mounted high on the inside walls (Figure C). For day heating, there are 6 spotlights mounted across the top. These track lights are nice, because you can swivel and aim them as needed. There is a full spectrum fluorescent tube light (4-foot) mounted across the upper back wall for UVB during the winter. All the lights are on timers to simulate day/night cycles. This is great for hands off operation. I adjust them to simulate the seasons.
Hiding Areas
The bin is “decorated” inside to simulate a forest floor with lots of hiding areas. A large hollowed out tree stump (Figure C) is in the center (Bill found it in the woods). The smaller turtles hide in there. The bigger turtles like to dig under it to sleep. Turns out that one of my females laid her eggs under the tree stump deep in the mulch during Christmas!! Clever spot she chose. Silk bushes and vines are stuck into the mulch through-out the rest of the bin for additional privacy. (I chose silk because they would munch on the real stuff.) Each turtle has their “preferred” hangout. Bill thought to mount a section of a house gutter on the upper back wall to act as a planter. It is filled with non-toxic plants to help with air purification.
Caves
There are two caves inside the bin, soon to be three (Figures B & C). Last summer I built a good size cave out of small diameter tree branches, cut to size. My lashing skills (learned in girl scouts) came in handy here to hold the branches together. Mulch covers the wood. A split log serves as a ramp for the turts to walk up and hang out on top. I placed a large silk “bush” of leaves on top of this cave for them to hide in. Murtz (our eastern box turtle) is so cute when she hides up there and peers out through the leaves. One of the spot lights shines there for basking.
The second cave consists of a giant Habba Hut (hollowed out half log) on the opposite side of the bin. The cave is butted up against the corner wall and placed on the mulch, with more mulch poured on top and down the sides. This serves as a ramp for curious torts to hang out on top. Again, there is a spot light and a silk bush for basking and privacy.
Once the turtles (and I) got adjusted to the set-up, their health and well being has been most excellent. I even catch a glimpse of the turtle “courtship” thing happening under the warm basking lights! The lengths we all go to in order to provide the best accommodations for our shelled friends.
Cost
Brace yourself, when all was said and done, the materials added up to around five hundred dollars! Ouch! Almost all of the materials are commonly available at a builders store, such as Home Depot. Despite the cost, we were actually quite pleased with the end result.
Step-by-step guide on how to build an indoor box turtle enclosure
Most experienced box turtle keepers agree that it is best to keep box turtles in an outdoor enclosure. However, there may be times when you need to bring a box turtle indoors and keep it in an indoor enclosure. For example, if a box turtle is injured or sick, if you want to keep box turtles indoor during the winter months, or if you want to raise baby box turtles indoors. Below you can find the detailed steps how to set up a simple indoor box turtle enclosure.
Here are the steps we use to build our baby box turtles’ indoor enclosure. The instructions can be used to make an enclosure of any size box turtle.
The ideal enclosure for your indoor box turtle habitat
We use a Rubbermaid Rough Tote. What size you use depends on the size and number of turtles that will be living in it, but we suggest getting the largest one you can find.
We currently have five baby box turtle in a 10-gallon Rough Tote, which is rapidly becoming too small. If you have one or two adult box turtles it’s best to get one of the 55-gallon Rough Totes. Bigger containers are always better! You can find these totes at Wal-Mart, Target, Sam’s Club, or Home Depot or on amazon for relatively low prices.
The bedding of the box turtle housing
You want to use a substrate (or bedding) that holds moisture, particularly if your house uses a gas-fired furnace for central heating. The indoor humidity in a gas-heated house can drop into the single digits, which is bad for your turtle. They need humidity to keep from developing eye problems. Most so-called “Vitamin A Deficiency” eye problems are actually not a lack of Vitamin A at all – they’re a response to low humidity.
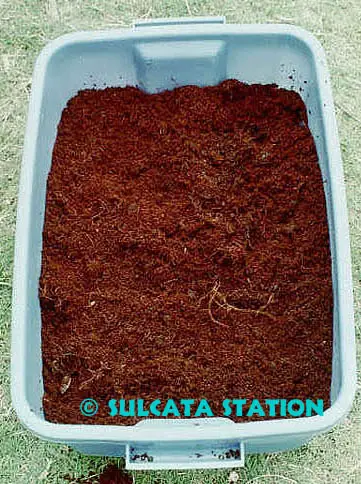
The substrate we use and recommend is called “Zoo Med Eco Earth” It’s made from ground-up coconut shells, so it is non-toxic and it holds humidity very well. When you buy it at the pet store or online, it comes compressed and dried into the shape of a rectangular brick. You put this brick into a five-gallon bucket, add a gallon of very warm water, and then let the stuff absorb the water and expand. It will expand greatly from the compressed brick, and will easily make enough to fill small containers. For a 55-gallon container, you will probably need at least two, better yet three bricks.
Put the substrate into the container in a layer deep enough to allow the turtle to dig down into it. For our babies we have a 4-inch-deep layer of substrate into which they have dug extensive burrows. For adult box turtles, the substrate should be *at least* six inches deep. This will allow them to dig burrows, which can help them to stay properly hydrated and avoid the aforementioned eye problems.
Furnishing the indoor box turtle enclosure
Include some items in the enclosure that your turtle can hide under and climb on. For our baby box turtles, we used thick strips of bark from a dead cottonwood tree near our yard.
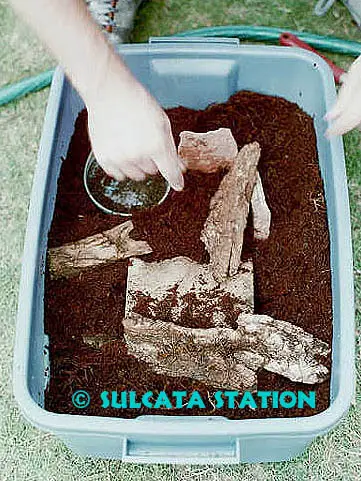
You can buy things for bird cages and/or reptile enclosures online or at the pet store, but don’t be afraid to use non-toxic things from around your house, either. Also put in some flat rocks (like flagstone or concrete pavers) to use as feeding rocks. These rocks will also get warm underneath your heat lamp, and then slowly release that heat at night, providing a bit of extra warmth for your box turtle.
Don’t forget a water bowl! This should be large enough for the box turtle to climb into, but shallow enough that the turtle can get out of it easily.
We’ve found that the saucers that go underneath potted plants work really well for this. We use the plastic ones made by Rubbermaid because they can be cleaned easily. If you use terracotta saucers, look for the ones that have a glazed interior, because they will be easier to clean out than the unglazed ones. Remember to change the water in the bowl at least once daily.
Lighting and heating of an indoor box turtle housing
This is one of the most critical issues in indoor box turtle care, second only to humidity levels in helping box turtles stay active and happy throughout the wintertime. Therefore, we also created a separate, much more detailed post on the temperature, lighting and humidity requirements for indoor box turtle habitats. Check it out here.
You need to provide bright lighting and sufficient warmth to keep the turtle from obeying his natural instincts, which might be telling him that it’s time to quit eating, slow down, and find a place to sleep for the winter. Turtles that are being kept indoors due to illness need to be kept very warm to help their immune systems fight off the infection.
You must also provide UV radiation (typically found in sunlight) to your turtle. Turtles and lizards need exposure to UVB radiation to help them produce Vitamin D3 in their bodies. The Vitamin D3 then helps the turtle or lizard to properly absorb and use the calcium in its diet, preventing serious health problems such as Metabolic Bone Disease and other potentially fatal disorders.
There are a variety of ways to provide heat and UVB using two separate types of bulbs and two separate fixtures. However, we have found that it’s really much easier to use a single, self-ballasted, mercury-vapor bulb over our turtle enclosure. This type of light bulb puts out both heat and UV radiation in quantities that benefit turtles, and only requires one fixture.
The mercury-vapor bulb that we use and recommend is the TEKIZOO Super Sun Reptile Land, avaliable on amazon and in selected pet stores.
You must use heat-resistant fixtures with mercury-vapor bulbs. Make sure that you get one with the porcelain socket, not a plastic socket. You want the porcelain socket because the heat lamp will be on at least 12 hours per day.
Plastic sockets could melt and cause a fire! You should be able to find a domed clamp-lamp at hardware stores, farm and ranch supply stores, or online at either of the reptile supply sources listed above. Whichever brand you purchase, we recommend using the 160-Watt Flood bulb, and mounting it between 12 to 16 inches above the substrate on one end of the enclosure. That way, your turtle can move to that “warm end” if he wants to warm up, or go to the opposite, cooler end if he needs to cool down. A digital thermometer is a necessity and will tell you what temperatures are available to the box turtles and will help you position the light and determine what watt flood bulb is right for your situation.
The UV Heat lamp should stay on for at least 12 hours per day, and then be turned off at night. We recommend buying an appliance or lamp timer (available in most hardware stores), and setting it so that it will be on for 12 hours and then off for 12 hours. Plug the lamp into the timer, and then plug the timer into a surge protector – this will help increase the life of your UV Heat bulb.
As for heating – the daytime temps in the enclosure should range from 70 to 85 degrees Fahrenheit. The nighttime temperatures should not drop below 65 degrees. If your turtle gets too cold at night, his system will start shutting down, and he may not eat or drink regularly. You can provide heat by using the above-mentioned UV Heat bulb, focused down on a big flat rock in the enclosure during the daytime. The rock will slowly release heat at night.
Where to keep the indoor box turtle habitat?
One important tip: don’t put the enclosure on the floor! Almost all homes are anywhere from 5 to 10 degrees colder near the floor. And any heat in the enclosure will leach down into the floor, particularly if you’ve got a tile floor or a concrete foundation. Put the enclosure up on a small table or bookcase. We keep our turtle and tortoise indoor enclosures in the same room as our computers, which are left on 24/7. The waste heat from the computer CPUs and monitors heats the room enough that we don’t have to provide supplementary heat to the room very often. We do have an electric, oil-filled radiator heater that we use to heat the room if it gets too cold.
The ideal level of humidity
An adequate level of humidity is critical for the health of your turtle. Buy a spray bottle or a pump sprayer that you can dedicate to misting your turtle’s enclosure daily. Use filtered or distilled water to prevent problems with bacteria or mineral buildups.
We found a 1-gallon pump sprayer on amazon and purchased it specifically for misting our reptile enclosures. The sprayer has never held anything but distilled water, so we know that there are no poison or weed killer residues in it. We mist all enclosures daily with the sprayer to raise the ambient humidity levels, and it has definitely helped keep all our reptiles healthy and happy.
You can also use sphagnum moss in the enclosure to help hold humidity. When you mist spaghnum moss, it will absorb and hold the water, gradually releasing it over the next few hours. The baby box turtles really like to burrow underneath the moss layer of their enclosure. It provides humidity and some camouflage for them as well.
Box turtle habitat maintainance
Whichever enclosure you build, it will need occasional cleaning. A good way to do this is to turn over the soil and add new topsoil to areas where the turtles spend a lot of time. This will disperse turtle droppings and any concentrations of mites or parasite eggs. If you have your turtle housed in a pond-liner setup with bark or dirt in it, remember that it must also be cleaned or replaced regularly. Feces and urine can accumulate to high levels if cleaning is not done often. Move the hide boxes to different locations once in awhile so fecal matter won’t accumulate in resting or sleeping areas.
Each turtle should have their own plate of food that is placed in the same area each time and taken out after an hour. Most turtles finish eating in 10-15 minutes. Ants can become a big problem if these precautions aren’t taken. Hatchlings have been eaten alive by ants. If you do have an ant problem, place bowls of ant bait outside the enclosure so there is no chance of your turtle eating it. Water bowls should have clean water placed in them daily and be thoroughly scrubbed clean every few days. Don’t give germs a place to grow and your turtles will stay healthier.
If the pen gets dirty quickly and it smells or looks bad, then your enclosure may be too small for the number of turtles in it. Do something about the problem before unsanitary conditions give them shell rot or make them sick.
I hope you have learned a lot from this post and are now ready to build your perfect box turtle habitat – outdoor or indoor. Let us know in the comment section if you have any questions or some tips and tricks to share.
Pin this post for later by clicking on the image below
9 thoughts on “The Ultimate Guide on How to Build an Indoor and Outdoor Box Turtle Habitat”
Comments are closed.